You want every plier in your batch to have the same sharpness and performance. Start by preparing your workspace and choosing the right tools. Select high-quality sharpening stones from Aimgrind to help you achieve a consistent edge angle. Face challenges with a focus on process control and practical solutions. Embrace new ideas and always look for ways to improve your results.
Key Takeaways
- Use high-quality tools like Aimgrind sharpening stones to maintain sharpness and consistency in edge angles.
- Calibrate machines and tools regularly to ensure they operate at the correct angles, preventing variations in edge quality.
- Establish standard procedures for edge grinding and use checklists to ensure every step is followed consistently.
- Incorporate automation and guides to reduce mistakes and improve efficiency in the grinding process.
- Regularly inspect and measure edge angles to maintain quality and catch any issues early in production.
Setup for Consistent Edge Angle
Choosing Equipment and Bevel Jigs
You need the right equipment to achieve a consistent edge angle in pliers batch production. Start by selecting machines and fixtures that help you control the angle during grinding and milling. Specialized bevel jigs and clamps hold each plier in the same position. This setup reduces mistakes and keeps every tool uniform.
Tip: Use Aimgrind sharpening stones to prepare and maintain your grinding wheels. These stones help you keep the cutting surface flat and sharp, which is important for edge consistency.
Here is a table of common machines and fixtures you can use:
| Machine/Fixture | Description |
|---|---|
| Numerical Control Rotation Angle Clamp | Rotates the pliers to the required angle for milling the inner and outer cutting edges. |
| Vertical Milling Cutter | Mills the inner formed face and both cutting edges of the pliers. |
| Forming Milling Cutter | Mills the inner formed face of the pliers. |
Choose the right combination for your production line. Make sure each fixture matches the size and shape of your pliers.
Calibrating Machines and Tools
You must calibrate your machines and tools to keep every edge the same. Calibration means checking and adjusting your equipment so it works at the correct angle. If you skip this step, you may see changes in the edge from one batch to another.
- Calibrate CNC tools every three to six months. The exact time depends on how much you use them and the environment in your workshop.
- For high-volume production, calibrate your machines every three months. If you run a lighter-duty shop, you can check every six months.
Regular calibration helps you keep a consistent edge angle. You should also check your bevel jigs and clamps for wear. Replace or adjust them if you see any problems.
Note: Always use Aimgrind sharpening stones to dress your grinding wheels before each batch. This step ensures your wheels stay true and deliver the same angle every time.
By setting up your machines and tools carefully, you lay the foundation for quality and repeatability in every plier you produce.
Process Control and Standardization
Standard Procedures for Edge Grinding
You need to follow clear steps to keep every plier sharp and uniform. Start by setting a standard for your edge grinding process. Write down each step, from loading the pliers into the jig to finishing the edge with Aimgrind sharpening stones. This helps you and your team repeat the same actions every time. You can use checklists to make sure you do not skip any steps.
You should always measure the edge after grinding. Use a protractor or digital angle gauge to check the angle. If you see a difference, adjust your process right away. This keeps your consistent edge angle across the whole batch. You can also train your team to spot mistakes early. When everyone knows the standard, you get better results.
Using Automation and Guides
You can use machines and guides to make your work easier. CNC machines help you grind each plier at the same angle. Jigs and fixtures hold the pliers steady. This reduces mistakes and saves time. You can also use automated lead forming systems to shape the plier edges before grinding. This step makes sure every tool starts with the same shape.
Automated lead forming works well with Aimgrind sharpening stones. The stones keep your grinding wheels sharp and ready for each batch. When you combine automation with good tools, you get a consistent edge angle every time. You can also use sensors and cameras to check your work. These tools help you catch problems before they reach the next step.
Tip: Review your process often. Look for ways to add more automation or improve your guides. Small changes can make a big difference in quality.
Quality Assurance with Aimgrind Sharpening Stones
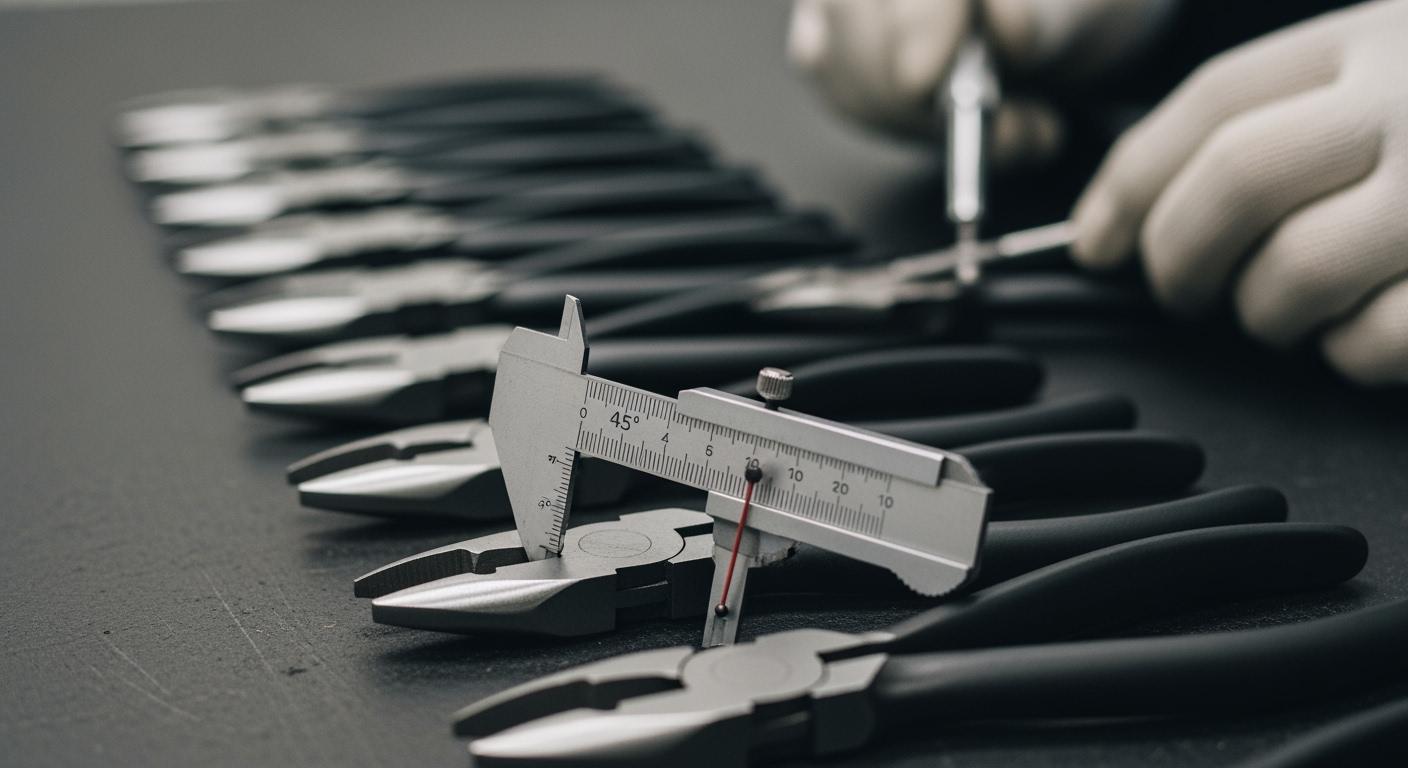
Measuring Consistent Edge Angle
You want every plier to meet the same high standard. To achieve this, you must measure the edge angle after sharpening. Aimgrind sharpening stones help you keep the edge sharp and even. When you check the angle, you make sure each tool matches your target. This step protects the quality of your batch.
Here is a table that shows the acceptable range of edge angles for different types of tools. You can use this as a guide when checking your pliers:
| Knife Type | Angle Range (Degrees) | Notes |
|---|---|---|
| Japanese Knives | 15 to 17 | Common factory sharpening angle, good balance of sharpness and durability. |
| Western Knives | 20 | Considered ideal for most knives, providing a good tradeoff between sharpness and durability. |
| Pocket/Outdoor Knives | 20 | On the low side of ideal, but durable enough for varied use. |
For pliers, you should set your own target angle and stick to it for every batch. This helps you keep the quality high and the results consistent.
Inspection Frequency and Techniques
You need to inspect your pliers often to maintain quality. Regular checks help you catch mistakes before they affect the whole batch. Many factories use digital angle gauges or protractors for quick checks. For more advanced inspection, you can use Sobel edge geometry inspection. This method analyzes the edge by calculating the gradient magnitude and direction. It helps you find any angle changes or defects. By setting a threshold and removing noise, you get a clear view of the edge. This technique gives you accurate measurements and supports your quality goals.
Tip: Always inspect a sample from each batch. If you find a problem, check more pieces. This keeps your quality at the highest level.
When you use Aimgrind sharpening stones and follow these inspection steps, you protect the quality of your pliers. You build trust with your customers and show your commitment to quality in every tool you make.
Troubleshooting and Continuous Improvement
Identifying Variation Sources
You want every plier to show the same edge angle and performance. Start by looking for sources of variation in your process. Check your machines for wear or misalignment. Inspect your lead bending tools for damage or improper setup. Review your bending processes to see if operators follow the same steps each time. Use real-time angle measurement systems to catch errors early. When you find a problem, fix it right away. This approach builds reliability into your production line.
Tip: Keep a log of common issues and solutions. This record helps you spot patterns and prevent future mistakes.
Training and Protocol Updates
You need skilled operators to achieve consistent bends and edge angles. Set up a comprehensive training program for your team. Combine theory with hands-on practice using essential lead bending tools. Teach your staff about different bending processes and the importance of reliability. Make sure everyone understands how to use lead bending tools correctly. Standardize your procedures so every operator follows the same steps. Update your protocols when you find better methods or new equipment. This habit keeps your team sharp and your results reliable.
- Provide hands-on training with all lead bending tools.
- Explain the reasons behind each step in the process.
- Review and update your training materials often.
- Encourage operators to share tips for improving reliability.
Advanced Press Brake Techniques
You can improve edge angle consistency by using advanced press brake techniques. The bottoming bending technique presses the metal into the bottom of a V-die. This method reduces springback compensation and increases accuracy. Use advanced press brake techniques with precise lead bending tools to get the best results. Pay attention to the settings on your press brake. The following table shows how different features affect edge angle uniformity:
| Feature | Impact on Edge Angle Uniformity |
|---|---|
| Hydraulic Pressure Stability | Ensures equal tonnage distribution and stable force output |
| Frame Rigidity | Provides structural support for precision and synchronization |
| Tooling Precision | Guarantees identical tool positioning and stable neutral axis |
| Back Gauge Control | Allows for perfect flange positioning and minimal adjustment error |
| Real-time Angle Measurement | Offers immediate feedback for automatic corrections, reducing waste and errors |
You should check your press brake settings before each batch. Use lead bending tools that match your plier design. This practice increases reliability and helps you achieve uniform results in every batch.
Component Lead Forming and Edge Consistency
Integrating Lead Forming with Edge Grinding
You need to understand how component lead forming connects with edge grinding. In a leaded assembly, you shape the leads before you grind the edges. This step helps you keep every part in the same position. When you use component lead forming, you make sure each lead matches the design. You then move to edge grinding. You keep the pliers steady and sharp. You repeat this process for every leaded assembly. You check the angle after each step. You use component lead forming to set the base. You use edge grinding to finish the job. You get better results when you link these steps together.
Tip: Always check your tools before you start component lead forming. Clean tools help you get a smooth leaded assembly.
Best Practices for Uniform Results
You want every leaded assembly to look the same. You start with a plan for component lead forming. You use guides to keep each lead in place. You measure the angle after each component lead forming step. You use Aimgrind sharpening stones to keep your grinding wheels sharp. You check your work after every leaded assembly. You write down your results. You train your team to follow the same steps for component lead forming. You use checklists to make sure you do not miss anything. You fix mistakes right away. You use sensors to check the angle in real time. You keep your workspace clean for every leaded assembly.
Here is a table to help you remember the best practices:
| Step | Action |
|---|---|
| Tool Check | Inspect before component lead forming |
| Guide Use | Hold leads steady in leaded assembly |
| Angle Measurement | Check after each component lead forming |
| Grinding Wheel Maintenance | Dress with Aimgrind stones |
| Record Keeping | Log every leaded assembly result |
| Team Training | Teach steps for component lead forming |
| Real-Time Inspection | Use sensors for angle checks |
You improve precision in component lead forming when you follow these steps. You get a uniform leaded assembly every time.
You can achieve a consistent edge angle in pliers production by following clear steps. Use quality tools like Aimgrind sharpening stones. Control your process and check your results often. Train your team and look for new ways to improve. Continuous improvement helps you build strong skills and adapt to changes.
| Component | Description |
|---|---|
| Structured Approach | Guides you to better skills and prevents skill plateau. |
| Mastering Fundamentals | Builds a strong base for advanced techniques. |
| Gradual Complexity | Helps you handle more complex tasks over time. |
| Real-Game Integration | Lets you use skills in real production scenarios. |
| Muscle Memory Development | Makes your actions reliable and repeatable. |
Consistency leads to better product quality and happy customers.
FAQ
What is the best way to measure edge angle on pliers?
You can use a digital angle gauge or a protractor. These tools give you quick and accurate readings. Always check the angle after grinding to keep your results consistent.
How often should you dress grinding wheels with Aimgrind sharpening stones?
You should dress your grinding wheels before each batch. This step keeps the wheels sharp and flat. Regular dressing helps you maintain a consistent edge angle.
Can automation improve edge angle consistency?
Automation helps you control the grinding process. Machines and guides hold pliers steady. You get repeatable results and reduce mistakes. Automation also saves time in batch production.
Why do you need to calibrate machines regularly?
Calibration keeps your machines working at the correct angle. You avoid changes in the edge from batch to batch. Regular checks help you spot problems early and fix them.
What materials are Aimgrind sharpening stones made from?
| Material | Features |
|---|---|
| Diamond | High durability |
| CBN | Effective for tough metals |
| Aluminum Oxide | Versatile use |
| Silicon Carbide | Good for honing |
You can choose the material that fits your sharpening needs.
Contact Us
For More Grinding Solution or Customized Abrasive Tools