Are you making critical errors when sharpening band saw blades? Poor technique affects blade sharpness and can shorten your blade life. Check if you are making these common mistakes:
- Skipping the cleaning process
- Using the wrong sharpening tool
- Ignoring tooth angles
- Overheating the steel
Making these errors can ruin a perfectly good band saw blade. You can learn to avoid them and achieve a perfect edge for every cut.
Key Takeaways
- Always clean your band saw blade before sharpening it. Dirt and resin make sharpening hard and can damage the blade.
- Use the right sharpening tool for your blade’s teeth. A wrong tool can ruin the blade’s shape and make it cut poorly.
- Keep the original angles of the blade’s teeth. Changing these angles makes the blade cut badly.
- Sharpen each tooth evenly. Uneven teeth make the blade vibrate and wear out faster.
- Do not let the blade get too hot when sharpening. Too much heat can make the steel soft and break the blade.
Mistake 1: Skipping Blade Cleaning
You might think a little sawdust is harmless. However, sharpening a dirty blade is a major mistake. It wastes your time and can damage the blade. A clean blade is the first step to a successful sharpening job.
Problem: Resin and Debris Buildup
Cutting wood, especially high-resin varieties, creates a sticky buildup called pitch. This accumulation of resin and debris negatively impacts your blade’s performance. It causes increased friction and heat. This can lead to problems with blade tracking on the wheels. A dirty blade also hides the true condition of the teeth, making accurate sharpening impossible.
The effects of this buildup are significant:
- Reduced Efficiency: A clean blade cuts smoothly. A dirty one struggles, leaving rough edges.
- Poor Precision: Debris can make the blade wander, ruining the accuracy of your cuts.
- Blade Dullness: Pitch buildup quickly dulls the cutting edge, forcing you to sharpen more often.
- Overheating Risk: Buildup traps heat. An overheated blade can break, creating a safety hazard.
Solution: Proper Blade Preparation
You should always clean your blade before sharpening. This simple step ensures you are working on a clean surface and helps extend the blade life. While cleaning, you can also inspect the blade for any nicks or damage.
Pro Tip: Establish a consistent cleaning schedule. Clean your blade after every few cuts or after finishing a large project to prevent heavy buildup.
You can use several effective solutions to remove pitch.
- Commercial Cleaners: Products like ZEP Heavy-Duty Citrus Degreaser or specialized blade cleaners work quickly. They remove resin without harming the blade.
- Household Solutions: A simple mix of dish soap and water or a soak in a Simple Green solution can also be effective. For a natural option, try boiling water with baking soda.
Always use a soft brush or cloth for scrubbing. Avoid harsh chemicals like oven cleaners. They contain lye, which can damage the brazing on carbide teeth and strip protective coatings.
Mistake 2: Using Incorrect Tools
Choosing the right tool is just as important as using the right technique. You might have a steady hand, but the wrong file or stone will undo all your careful work. It is a common error that leads to poor results and frustration.
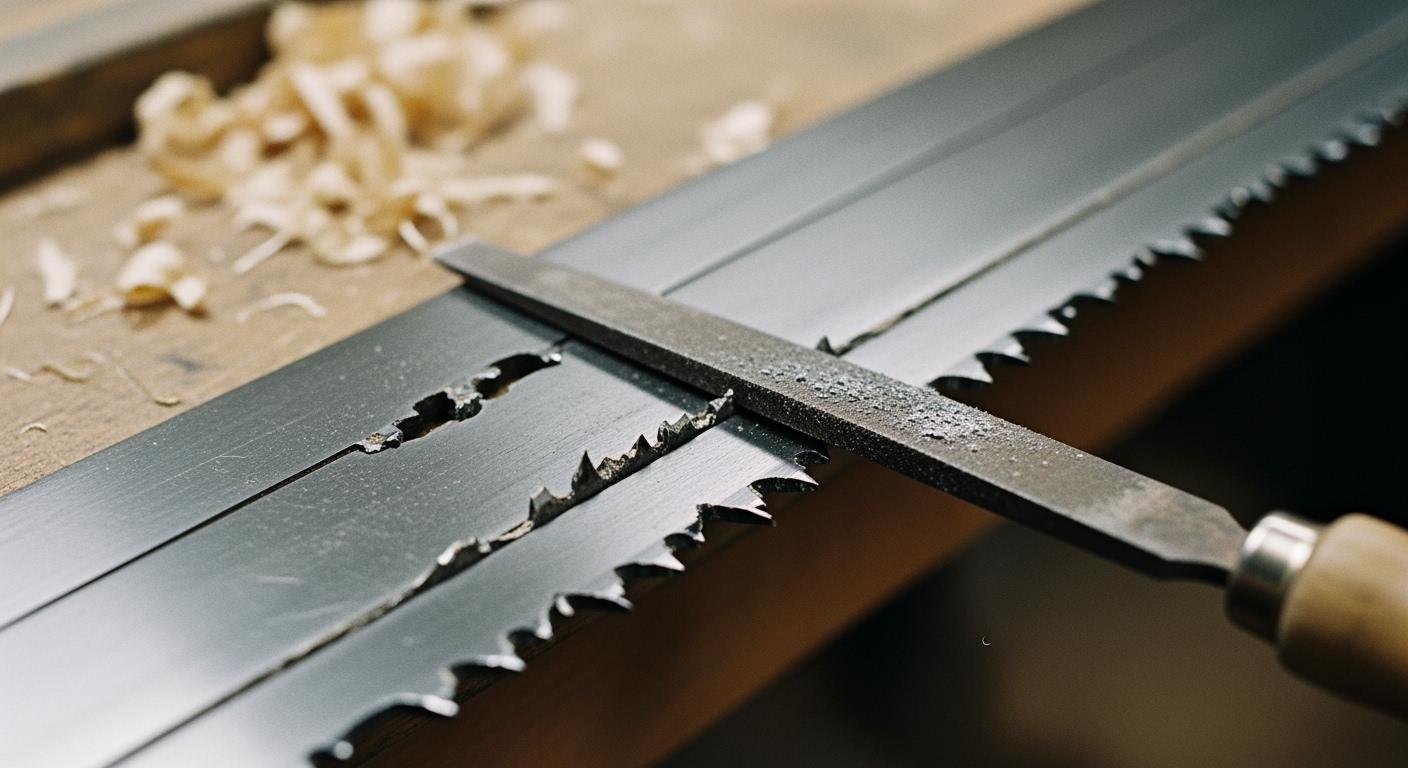
Problem: Mismatched Tool Profile
Imagine trying to fit a square peg into a round hole. That is what happens when your sharpening tool does not match your blade’s tooth profile. Each blade has a specific tooth shape and spacing, known as Teeth Per Inch (TPI).
Using the wrong tool causes serious problems:
- A file that is too large will grind down the tips of neighboring teeth. This changes their height and shape, leading to a rough cut.
- A file that is too small will create a narrow, rounded gullet. This weak point can cause the tooth to crack or break under pressure.
Both mistakes ruin the blade’s geometry and can significantly shorten your blade life.
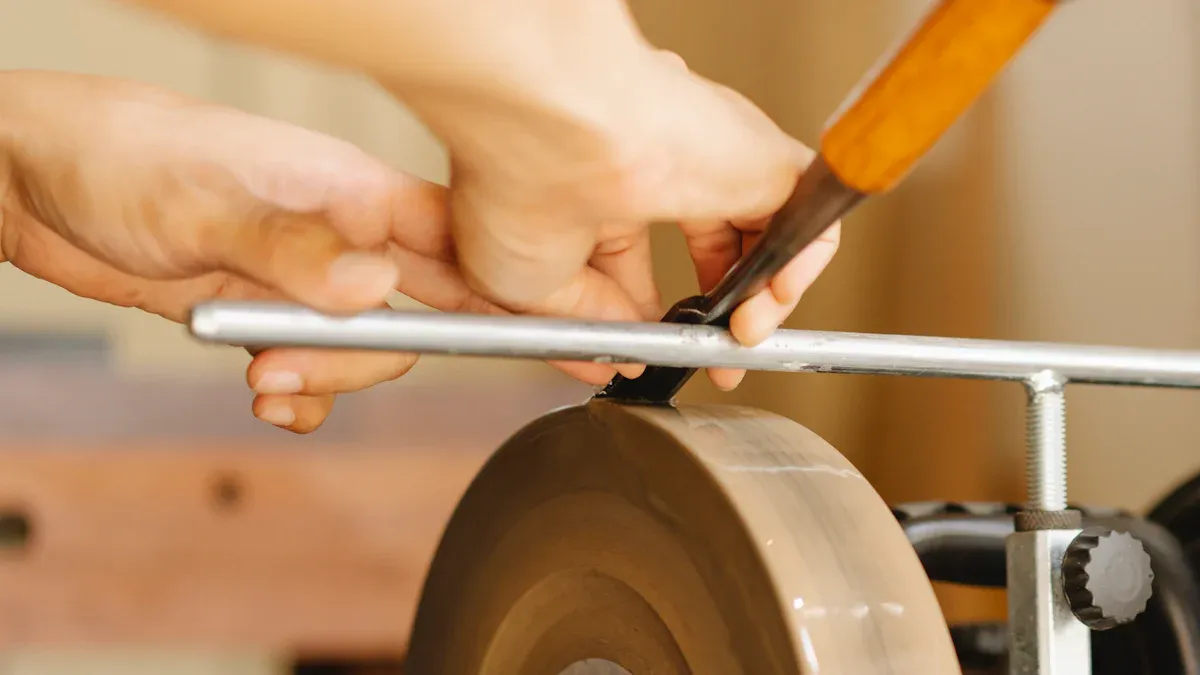
Solution: Selecting the Right Abrasive
You must select an abrasive that fits the blade’s tooth shape and TPI. The goal is to find a tool that nests perfectly in the gullet—the curved area between each tooth.
Quick Tip: A good rule of thumb is to choose a round or triangular file that is about twice the diameter of the blade’s gullet. This allows the file to contact the front and back of the tooth simultaneously, maintaining the original shape.
For manual tasks like sharpening band saw blades or dressing grinding wheels, the quality of your abrasive is critical. High-quality sharpening stones give you the control and durability needed for a precise edge. Aimgrind offers a versatile range of sharpening stones in materials like diamond and aluminum oxide. These tools are durable and highly effective for maintaining a sharp edge on many tools, ensuring you get the best performance from your equipment.
Mistake 3: Ignoring Tooth Geometry
Every tooth on your band saw blade has a specific shape for a reason. This shape, or geometry, includes critical angles that determine how the blade cuts. When you sharpen, you can accidentally change these angles. This mistake can make a sharp blade cut poorly.
Problem: Altered Hook and Back Angles
Two of the most important angles are the hook angle and the back angle. The hook angle controls how aggressively the blade bites into the wood. A positive hook angle helps pull the blade into the material. A neutral or negative angle can cause the blade to drag or rub instead of slice.
Changing these angles creates major cutting problems:
- Too much hook angle makes the blade overly aggressive. This can cause the gullets to choke with sawdust, leading to increased friction and heat.
- Too little hook angle reduces the blade’s bite. The teeth will rub against the wood, creating a rough finish and dulling the blade quickly.
The industry standard hook angle is often 10 degrees. Even a small change from the original design can ruin the blade’s performance and lead to unstable cuts.
Solution: Maintaining Original Angles
You must maintain the blade’s original tooth geometry when sharpening band saw blades. Your goal is to follow the existing angles on the face and back of each tooth. This ensures the blade cuts as the manufacturer intended.
Pro Tip: Use a 7x or 10x magnifier to inspect the tooth angles before and after you sharpen. This helps you see the precise shape you need to follow and check your work for consistency.
Different woods require different angles for the best cut. You can optimize your blade for specific tasks if you know the right geometry.
- Softwoods cut best with a hook angle around 10 degrees.
- Hardwoods like oak or hickory need less aggression, so an 8-degree hook angle works better.
By paying close attention to these details, you preserve the blade’s cutting efficiency. You also need to maintain the clearance angle on the back of the tooth. This ensures the body of the tooth does not rub against the wood, which reduces friction and heat.
Mistake 4: Inconsistent Sharpening
Consistency is key to a well-performing blade. You might sharpen each tooth, but if you do it unevenly, the blade will cut poorly. This common mistake can make your blade chatter, wander, or produce a rough finish, even if the teeth feel sharp to the touch.
Problem: Uneven Tooth Height
When you sharpen a blade, you remove a small amount of metal from each tooth. If you apply different amounts of pressure or use a different number of strokes on each tooth, you create uneven tooth heights. Some teeth will be taller than others. The taller teeth do all the work, while the shorter ones barely touch the wood.
This imbalance causes several issues:
- Rough Cuts: The blade will vibrate and leave a washboard-like surface on your wood.
- Increased Wear: The taller teeth dull much faster because they are overworked.
- Blade Wander: An uneven blade is more likely to drift off your intended cut line.
Inconsistent work during sawmill blade sharpening effectively ruins the blade’s balance and cutting performance.
Solution: Consistent Sawmill Blade Filing
Achieving uniform teeth is the goal of proper sawmill blade filing. You need a repeatable process to ensure every tooth is sharpened identically. Several techniques can help you maintain consistency and get a perfect edge.
Quick Tip: Use a permanent marker to color the face of each tooth before you start. As you file, the ink is removed, showing you exactly where you are removing material. This helps you file evenly and track your progress.
For ultimate repeatability, a sharpening jig is an excellent tool. It holds the file at a consistent angle and depth. When using a jig, follow these best practices for a uniform result:
- Mark the tooth with a black sharpie to see where the file is cutting.
- Only apply pressure on the push stroke for better control.
- Move the file sideways as you push to prevent creating dips.
- Clean your file often to stop it from clogging and gouging the tooth.
- Set up a screw or bolt as a file stop to ensure each plunge is the same depth.
Counting your file strokes for each tooth is another simple yet effective method to ensure uniformity.
Mistake 5: Overheating During Sawmill Blade Sharpening
You create friction when you grind metal against metal. This friction generates heat. A little heat is normal, but too much can destroy your blade. This is one of the most damaging errors in sawmill blade sharpening because it can permanently ruin the steel.
Problem: Ruining the Blade’s Temper
Every blade has a specific “temper.” Temper refers to the hardness and flexibility of the steel, achieved through a special heat-treating process. When you overheat a tooth during sharpening, you ruin this temper. The steel becomes soft, or “annealed.”
A softened tooth cannot hold a sharp edge. It will dull almost immediately when you start cutting. This makes your sharpening efforts a complete waste of time. Worse, the extreme heat can make the steel brittle, causing the tooth to chip or snap off entirely. This significantly shortens the blade life and can create a safety hazard.
Solution: Keeping the Steel Cool
You must manage heat to protect your blade’s temper. The key is to work slowly and use a light touch. Rushing the job creates excessive friction and heat.
Pay close attention to warning signs that the steel is getting too hot. Your senses are your best guide when sharpening band saw blades.
Watch for These Red Flags 🚩 A burning smell is a clear signal that the blade is overheating. You should also watch for visual cues that tell you to stop and let the steel cool down. These include:
- Steel color change: The edge turning blue, purple, or straw-colored is a definite sign of overheating.
- Sparks flying: If you see a shower of sparks, you are burning the steel. This means temperatures have exceeded 1300°F.
If you notice any of these signs, stop immediately. Let the tooth cool to room temperature before you continue. You can also dip the blade in water periodically to help dissipate heat. Working carefully and keeping the steel cool ensures your blade remains strong and holds its edge.
Mistake 6: Neglecting the Tooth Set
You can have the sharpest teeth in the world, but your blade will still perform poorly if you ignore the tooth set. The “set” is the slight bend of each tooth away from the blade body, typically in a left, right, and straight pattern. Forgetting to check and correct this after sharpening is a mistake that directly impacts your blade’s efficiency.
Problem: Insufficient Blade Clearance
The purpose of the tooth set is to create a cut, or “kerf,” that is wider than the blade itself. This space is called clearance. Without enough clearance, the body of the blade rubs against the sides of the wood as it cuts.
This friction causes a cascade of problems:
- Heat Buildup: The constant rubbing generates excessive heat, which can damage the blade’s temper.
- Blade Binding: The blade can get pinched or stuck in the cut, leading to a stalled motor or a broken blade.
- Poor Sawdust Removal: The gullets cannot effectively clear sawdust from a tight kerf, causing them to clog.
- Wandering Cuts: A blade with no clearance is difficult to steer and will often wander off your cut line.
Ultimately, insufficient clearance leads to rough finishes and puts unnecessary strain on both your blade and your saw.
Solution: Using a Tooth Setter
You can restore the proper clearance with a tool called a tooth setter. This device allows you to precisely bend each tooth to the correct angle. Using a manual tooth setter is a straightforward process that greatly improves your cut quality.
Pro Tip: Check the blade’s original packaging or the manufacturer’s website for recommended tooth set values. Use these as a starting point and adjust based on your experience for the best results.
To correctly use a manual setter, follow these general steps:
- Prepare the Blade: Always start with a clean blade. Any resin or debris will affect the accuracy of the set.
- Adjust the Height: Position the blade in the setter so the bottom of the gullet is just below the tool’s clamping edge.
- Find the Set Point: Adjust the tool to bend the tooth at a point about one-third of the way down from the tip.
- Follow the Pattern: Advance the blade and set each tooth according to its pattern (e.g., left, right, straight). Be careful to follow the existing pattern, as mistakes are hard to fix.
After setting one side, you may need to flip the blade over to set the teeth on the other side. Taking the time to do this correctly ensures your blade cuts straight, cool, and efficiently.
Mastering how to sharpen a blade is about avoiding common pitfalls. You can achieve excellent blade sharpness by steering clear of these six mistakes:
- Skipping blade cleaning
- Using the wrong tools
- Ignoring tooth angles
- Inconsistent sharpening
- Overheating the steel
- Forgetting to reset the teeth
Proper blade maintenance is key to better cut quality and a longer blade life. This commitment to blade maintenance reduces replacement costs, saving you significant money. Your efforts in sharpening band saw blades will pay off with every clean, precise cut you make.
FAQ
How often should you sharpen a band saw blade?
You should sharpen your blade after about two to four hours of cutting time. Listen to your saw. If it starts cutting slower or leaving a rough finish, it is time to sharpen the blade. Regular sharpening extends the blade’s life and improves cut quality.
Can you sharpen any type of band saw blade?
You can sharpen most carbon steel and bi-metal blades. However, carbide-tipped blades require specialized diamond grinding wheels and equipment. Attempting to sharpen carbide teeth with standard files will damage both the file and the blade. Always check the manufacturer’s recommendations before you begin.
What is the best tool for a beginner to use?
A sharpening jig is an excellent choice for beginners. It holds the file at the correct angle and depth for you. This tool helps you achieve consistent results across every tooth. Pairing a jig with a quality sharpening stone or file ensures a great start.
When should you replace a blade instead of sharpening it?
You should replace a blade when it has multiple cracked or missing teeth. Also, inspect the blade body for cracks or signs of metal fatigue. If the blade has been sharpened so many times that the teeth are too small, it is time for a new one.
Safety First! ⚠️ Never use a blade with a crack in its body. A cracked blade can break during operation, creating a serious safety risk.