You can solve grinding chatter and this frustrating vibration problem. The solution is a systematic approach. A successful grinding process requires you to diagnose the source of the grinding chatter. This involves a step-by-step check of four key areas.
Your Diagnostic Roadmap: 🗺️
- The Grinding Machine
- The Grinding Wheel
- The Workpiece Setup
- Your Grinding Parameters
This method helps you pinpoint the cause of cylindrical grinding chatter. You can eliminate the unwanted vibration and chatter to achieve a flawless surface. This improves your entire grinding process for a better final surface.
Key Takeaways
- You must check four main areas to fix grinding chatter: the machine, the wheel, the workpiece setup, and the grinding settings.
- You can spot chatter by looking for wavy patterns on the part or by hearing loud, rhythmic noises during grinding.
- You must balance the grinding wheel and dress it correctly for a sharp cut.
- You must secure the workpiece and machine parts tightly to prevent movement.
- You must use the right speeds, feeds, and coolant flow to stop vibration.
Identifying Grinding Chatter Signs
You can identify grinding chatter before it ruins your workpiece. The first step is to use your eyes and ears. These senses are excellent tools for detecting problems during the grinding process. Learning the signs helps you act quickly.
Visual Cues on the Workpiece
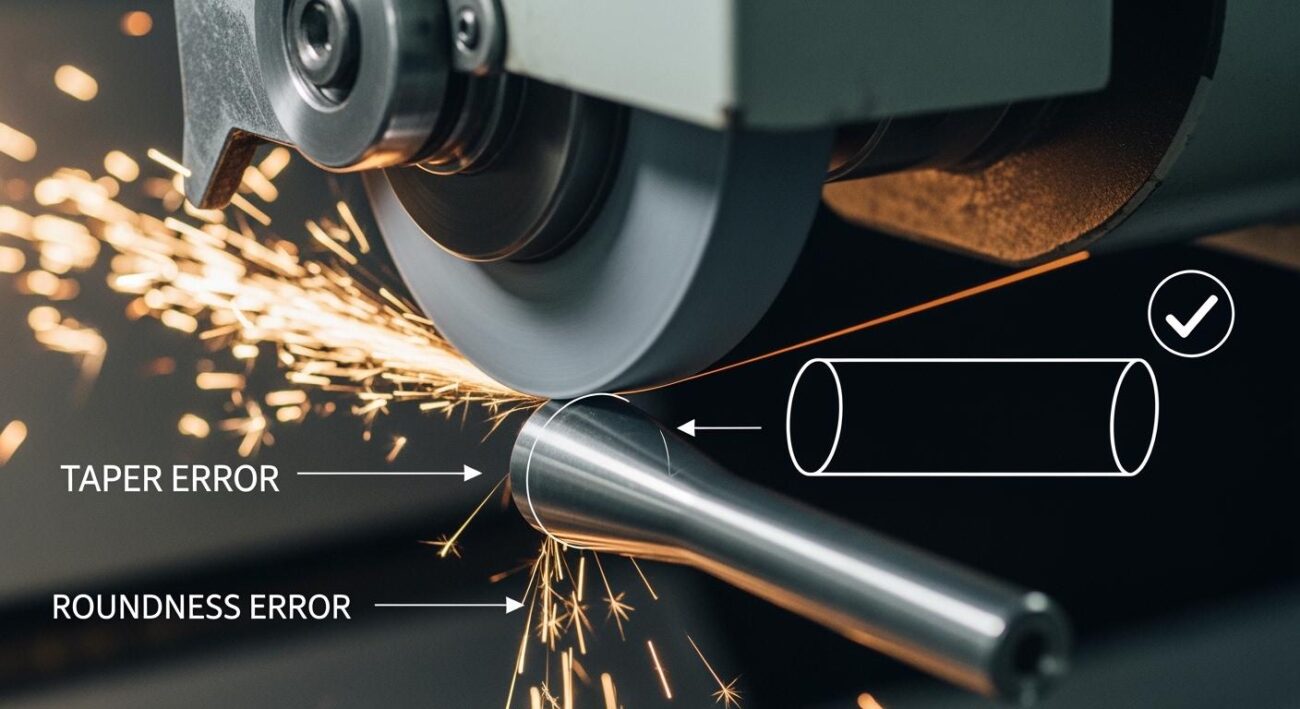
You should inspect the workpiece surface closely. Grinding chatter leaves distinct, repeating marks. These patterns are a clear signal that something is wrong. A perfect grinding process creates a smooth, uniform surface.
Look for these common visual signs of chatter:
- Wavy or Rippled Patterns: You will see a consistent wave-like texture along the length of the workpiece.
- Spiral or “Barber Pole” Marks: These marks wrap around the part in a spiral shape.
- Checkerboard Patterns: You might notice a grid-like pattern on the finished surface.
Any of these patterns indicate a vibration problem. This unwanted movement creates an uneven surface and compromises the quality of your part.
Auditory Signs During Grinding
Your ears can often detect grinding chatter before your eyes can. A stable grinding operation has a specific sound. You should hear a smooth, consistent hissing or rushing noise. This sound tells you the wheel is cutting material evenly.
Listen for the Noise of Trouble 🔊
An unstable process creates a much different sound. You will hear a loud, rhythmic humming, screeching, or rumbling noise. This sound often gets louder as the chatter worsens. This audible warning is a direct symptom of cylindrical grinding chatter. Do not ignore this sound. It signals a problem that needs immediate attention to prevent damage.
Diagnosing the Causes of Grinding Chatter
Once you can spot the signs of chatter, your next step is to find the source. The causes of grinding chatter are rarely random. They hide in one of four main areas of your setup. You can use the following checklist to systematically inspect your grinding process and uncover the root of the problem.
Grinding Wheel and Dressing Issues
Your grinding wheel is where the action happens. Even a small issue here can create significant vibration. Start your diagnosis with the wheel itself.
- Unbalanced Wheel: An out-of-balance wheel is a primary cause of grinding chatter. This imbalance creates a powerful centrifugal force that shakes the entire system. For high-precision grinding, you need exceptional balance. The ISO standard G1.0, for example, allows for a residual unbalance of only 1.0 mm/s and is used for sensitive grinding machine drives.
- Glazed or Loaded Wheel Face: The wheel’s cutting surface can lose its effectiveness over time. You should check for two common conditions:
- Glazed Wheel: The abrasive grains become dull, and the wheel surface looks shiny. You may also see dull orange sparks instead of bright white ones. A glazed wheel stops cutting material effectively.
- Loaded Wheel: Metal chips from the workpiece clog the spaces between the abrasive grains. This prevents the wheel from cutting freely and can cause chatter.
- Improper Dressing: Your dressing technique can either prepare the wheel for success or failure. A dull diamond, an incorrect traverse speed, or an inconsistent dressing depth can create patterns on the wheel face that transfer directly to your workpiece as chatter.
Workpiece and Fixturing Instability
The workpiece must remain perfectly still during the grinding process. Any movement, no matter how small, will lead to imperfections and vibration.
Rule of Thumb: Rigidity is King 👑
A stable workpiece is a quiet workpiece. If your part can flex or vibrate, it will. Ensure your entire setup, from the chuck to the tailstock, is as rigid as possible.
Check these key areas for instability:
- Inadequate Workpiece Support: Long or thin parts are prone to bending under grinding pressure. You must use steady rests or other supports to prevent this deflection. Without proper support, the part will vibrate, causing chatter.
- Weak or Inconsistent Clamping: Your chucks and fixtures must hold the workpiece with consistent force. If your hydraulic system is weak, you might experience slow chuck operation or inconsistent clamping pressure. This allows the part to shift slightly during grinding, which is a direct cause of chatter.
Machine Component and Foundation Problems
Sometimes, the problem lies within the machine tool itself. Wear and tear on critical components can introduce slop and vibration that ruins your surface finish.
- Worn Spindle Bearings: The spindle bearings support the grinding wheel. When they wear out, they allow for excessive movement. For precision cylindrical grinding, the vibration displacement should be below 0.00003 inches. Even a small increase in bearing wear can significantly raise this vibration amplitude and cause problems.
- Loose or Worn Drive Components: Other moving parts can also be culprits. Listen for unusual noises and look for erratic movements. These can signal issues like:
- Worn ball screws causing positioning errors.
- Loose headstock or tailstock assemblies.
- Failing hydraulic pumps creating excessive noise or heat.
- Unstable Foundation: The machine must sit on a solid, level base. Use a spirit level to confirm your machine is perfectly level. An unstable or uneven foundation allows external vibrations to affect your grinding operation. In some shops, vibrations from a machine far across the room can travel through the floor and cause issues.
Incorrect Process Parameters
The final area to investigate is your set of grinding parameters. The wrong speeds, feeds, or depths of cut are common causes of grinding chatter. You must match your parameters to the material, the wheel, and the machine.
- Mismatched Speeds and Feeds: The ratio of the grinding wheel’s surface speed to the workpiece’s rotational speed is critical. When these speeds are not synchronized correctly, they can create a harmonic vibration that results in chatter.
- Aggressive Depth of Cut: Trying to remove too much material in one pass puts immense pressure on the wheel and workpiece. This can cause both to deflect, creating chatter. For finishing passes on hardened steel, you should use a very small depth of cut, often less than 0.01 inches, to stabilize the cut and eliminate vibration.
- Poor Coolant Application: Coolant does more than just cool the part; it also lubricates the cut and flushes away chips. If your coolant flow is weak or aimed incorrectly, it can lead to thermal expansion and chip buildup, both of which contribute to an unstable grinding process.
Solutions to Prevent Grinding Chatter
Diagnosing the problem is the first half of the battle. Now you can apply targeted solutions to fix the root cause. You can prevent grinding chatter by focusing on the same four areas: your wheel, your workpiece setup, your machine, and your parameters. Following these steps will help you restore stability to your grinding process.
Balance and Dress the Grinding Wheel
A well-prepared grinding wheel is your first line of defense. An unbalanced or poorly dressed wheel will always cause problems. You must give it the attention it deserves.
1. Achieve Perfect Wheel Balance
An out-of-balance wheel is a guaranteed source of vibration. You should use a dynamic balancing system to correct this. These systems measure imbalance while the spindle is running and guide you in making precise adjustments. When choosing a system, you should consider a few key specifications:
- Speed Range: The system must match your spindle’s RPM, especially for high-speed grinding.
- Sensor Accuracy: Look for high-resolution sensors that can detect tiny vibrations.
- User Interface: Modern digital displays make the balancing process faster and easier.
- Portability: A standalone unit gives you the flexibility to balance wheels on multiple machines.
You have two main options for dynamic balancing, each with different costs and features.
| Balance Method | Average Cost | Installation | Data Logging |
|---|---|---|---|
| Manual Dynamic | $2,800 | Professional recommended | Limited (USB export) |
| Automatic Dynamic | $8,500 | Factory-integrated | Full CNC integration |
2. Dress the Wheel for a Sharp, Clean Cut
Dressing prepares the wheel’s surface for grinding. A proper dressing technique removes dull grains and clears away loaded material, which helps prevent grinding chatter.
- Match the Tool: You must use a dressing tool that is right for your wheel’s bond type (resin, metal, or vitrified).
- Clean the Wheel: Before and after dressing, you should use coolant or a dust extractor to remove all debris. A clean wheel face prevents re-contamination.
- Apply with Consistency: You need to use a smooth, steady motion across the entire wheel face. Uneven speed or pressure will create an inconsistent surface and lead to chatter.
Select the Right Grinding Wheel
The grinding wheel itself can either absorb vibration or create it. Your choice of wheel has a major impact on the stability of the grinding process.
The bond is the material that holds the abrasive grains together. The bond type significantly influences chatter. For example, softer bonds allow dull grains to break away more easily, which maintains a free-cutting action. This is especially helpful on less rigid machines. Rubber bonds are known for their flexibility and dampening effect, which produces a very smooth, chatter-free cut.
For challenging materials, you may need a more advanced solution. When grinding hardened steels and superalloys, conventional abrasive wheels often wear quickly and perform poorly. This can cause thermal issues and grinding chatter.
A Definitive Solution for Tough Materials Choosing a high-performance wheel can be a game-changer. For hardened steels, tool steels, and superalloys, you should consider Aimgrind’s CBN grinding wheels. These wheels offer high hardness and excellent thermal stability. Their benefits directly combat the causes of chatter:
- Cooler Operation: CBN wheels reduce the risk of thermal damage and warping.
- Longer Life: They maintain their shape and sharpness longer, providing a consistent cutting action that reduces vibration.
- Fewer Wheel Changes: This benefit reduces machine downtime and improves overall efficiency.
Secure the Workpiece and Machine
Rigidity is non-negotiable. Any movement in the workpiece or machine components will be magnified during grinding. You must ensure everything is locked down tightly.
Support Long or Thin Workpieces
Long, slender parts are very likely to bend or vibrate under grinding pressure. You must use a steady rest to provide support along the length of the part. A steady rest acts as a “third hand” to prevent the part from flexing away from the wheel.
You should choose a steady rest over a tailstock in these situations:
| Feature | Tailstock | Steady Rest |
|---|---|---|
| Support Location | End of the part only | Middle or any length of the part |
| End Machining | Impossible (blocks access) | Excellent (leaves end open) |
| Rigidity | Moderate (prone to middle flex) | High (prevents bowing) |
When using a steady rest, remember to turn a true, round surface for the rest to clamp onto first. You also need to ensure its center aligns perfectly with the spindle’s center to avoid bending the part.
Confirm Clamping and Machine Stability
Your chucks, fixtures, and machine components must be secure. While factory torque specifications for components like headstock bolts are often not provided, you must ensure they are tight. A common practice is to tighten bolts until the bearing clearance stabilizes. If you are unsure, you can refer to default standards based on the bolt size. A loose headstock or tailstock is a direct cause of cylindrical grinding chatter.
Optimize Speeds, Feeds, and Coolant
Your final step is to fine-tune your process parameters. The right combination of speed, feed, and coolant will stabilize the cut and help you prevent grinding chatter.
Synchronize Speeds and Feeds
The relationship between the wheel speed and the workpiece speed can create harmonic vibrations. If you experience chatter, try adjusting the workpiece speed up or down slightly. This change can disrupt the harmonic frequency and eliminate the vibration. You should also use a smaller depth of cut for finishing passes to reduce grinding pressure.
Apply Coolant Correctly
Grinding generates a massive amount of heat. Coolant is essential to prevent thermal damage and flush away chips. Incorrect coolant application is a common source of problems.
Coolant is More Than Just a Liquid 💧 You need the right flow rate and pressure to be effective. Too little flow will not remove heat, and too much pressure can damage certain wheels.
- For Cooling: You should use a high-flow, low-pressure system. A flow rate of 1.5 to 2 gallons per minute (GPM) per spindle horsepower is a good starting point.
- For Wheel Cleaning: You can use a high-pressure system. Vitrified-bond wheels can handle up to 800 psi, while metal-bond wheels can take up to 1,500 psi.
Proper coolant application prevents thermal expansion, which is a hidden cause of chatter. It ensures the part remains dimensionally stable throughout the grinding operation.
Advanced Troubleshooting for Stubborn Vibration
Sometimes, you follow all the basic steps, but a stubborn vibration problem remains. When standard fixes are not enough, you can turn to advanced techniques. These methods help you tackle the complex physics behind the most persistent grinding chatter.
Common Causes of Cylindrical Grinding Chatter
A difficult vibration problem often comes from self-excited vibration. This type of chatter starts small and builds up over time during the grinding process. It creates a cycle that makes the vibration worse with each pass.
Two Types of Self-Excited Vibration ⚙️
- Work-Regenerative Chatter: Waves form on the workpiece surface. Each new pass over these waves changes the cutting depth, which feeds the vibration. This is common in cylindrical grinding at high work speeds.
- Wheel-Regenerative Chatter: Waves build up on the grinding wheel itself. This problem gets worse with each part you grind until you re-dress the wheel.
These issues often begin with small imperfections, like wheel run-out or eccentricity, which create an unstable grinding process.
Adjusting Parameters to Disrupt Harmonics
You can fight vibration with vibration. A powerful technique is to vary the spindle speed while you are grinding. This method is called Spindle Speed Variation (SSV). By deliberately changing the speed, you disrupt the rhythm of the chatter. This change prevents the vibration from building up into a harmonic frequency. Even a small, controlled change in RPM can break the feedback loop that causes chatter, stabilizing the cut.
Using Contact-Length Filtering
Another advanced strategy is contact-length filtering. This method uses the grinding wheel to smooth out its own vibration marks. You can achieve this by changing your parameters to increase the contact area between the wheel and the workpiece.
The goal is to make the contact length larger than the chatter wavelength. You can do this by:
- Increasing the depth of cut.
- Decreasing the feed rate.
This combination allows the wheel to grind away the peaks of the chatter marks, creating a smooth surface even if some vibration is still present. For example, one successful application reduced vibration amplitude from 79 microinches down to just 8 microinches by using a single deep pass instead of multiple shallow ones.
You can eliminate grinding chatter with a systematic strategy. Your focus on key checks is the fastest path to a high-quality surface. This method ensures you achieve a smooth surface every time.
Your Path to a Perfect Surface: ✅
- Balance your grinding wheel.
- Secure your workpiece.
- Optimize your grinding parameters.
Following these steps helps you produce a flawless surface. You can create a chatter-free surface with the right knowledge and tools. Your final surface will show the quality of your work.
FAQ
What is the first thing I should check for chatter?
You should start with the most common causes. First, check your grinding wheel for proper balance. Next, confirm your workpiece is held securely. An unstable wheel or part is the primary source of vibration.
Can the wrong grinding wheel cause chatter?
Yes, your wheel choice is very important. A wheel with a bond that is too hard can cause chatter. You should select a wheel that matches your material. For tough metals, a high-performance wheel like CBN often solves the problem.
How does coolant affect grinding chatter?
Coolant prevents your part from getting too hot. It also washes away metal chips. Poor coolant flow can cause the part to warp from heat. This thermal instability is a hidden cause of vibration.
Is chatter always a loud, screeching noise?
No, chatter can make different sounds. You might hear a rhythmic humming, rumbling, or screeching. Any sound that is not a smooth, consistent hiss can signal a vibration problem. You should listen carefully during every operation. 👂
Contact Us
For More Grinding Solution or Customized Abrasive Tools