You must always check your grinding wheel before use. This simple step is critical for your safety. A damaged grinding wheel can shatter, ejecting fragments at high speed.
Safety Alert: ⚠️ Annually, over 5,400 injuries are recorded from angle grinders. A majority of these accidents are caused by shattering abrasive wheels.
The most reliable way to check grinding wheel quality is the “ring test.” This test uses sound to find a hidden crack invisible to your eyes. A good wheel makes a clear, metallic ring when tapped. A damaged wheel produces a dull thud. This quick check is an essential safety procedure before you mount any wheel.
Key Takeaways
- Always check your grinding wheel before you use it. This simple step keeps you safe.
- Use the ‘ring test’ to find hidden cracks. A good wheel makes a clear ring. A bad wheel makes a dull thud.
- If a wheel fails the ring test, you must destroy it. Never use a damaged wheel.
- Also, look at the wheel for cracks or chips. Check the paper washers (blotters) and make sure the wheel’s speed matches your grinder.
The Essential Ring Test
The ring test is your first line of defense against catastrophic failure. It is a simple, effective method to find hidden damage inside a grinding wheel. A wheel can look perfect on the outside but contain dangerous internal cracks from shipping or handling.
Why the Ring Test Matters
Ignoring this simple check can have severe consequences. A damaged wheel can shatter during operation, turning into high-velocity projectiles. History shows us many examples of these failures:
- A detached wheel once ran across a shop floor, hit a wall, and shot upwards.
- A workpiece was thrown 50 feet at head height from a grinder with a damaged wheel.
- A grinding pad broke loose, shattered a cast iron guard, and flew through the building’s roof.
These events highlight the immense force involved and the critical need for pre-use inspection.
Tools for the Test
You do not need special equipment for this test. You only need a simple, non-metallic object to tap the wheel.
- Use the plastic or wooden handle of a screwdriver.
- A small wooden mallet also works well.
Never use a metal tool. Metal can damage the wheel or produce a misleading sound.
Preparing Your Workspace
Proper preparation ensures you get an accurate result. First, gather your grinding wheel and your non-metallic tapping tool. Next, find a suitable location to perform the test.
Pro Tip: Find a quiet area for the test. A space away from loud machinery, like a supply closet or a quiet corner of the workshop, will help you hear the sound clearly.
A clean, uncluttered space will prevent the wheel from being damaged if you accidentally drop it.
How to Perform the Ring Test
Now you are ready to perform a ring test. This process is quick and straightforward. Follow these three steps carefully to ensure your safety and the integrity of your equipment.
Step 1: Suspend the Wheel
You must allow the grinding wheel to hang freely. This freedom of movement is essential for the wheel to vibrate and produce a clear sound. The method for suspension depends on the wheel’s size.
- For smaller wheels: Place your finger or a small pin through the arbor hole. Let the wheel hang freely without touching any other surfaces.
- For larger wheels: You can use a different method if the wheel is too heavy to hold.
For suspending a large-diameter grinding wheel for the Ring Test, one method is to ‘stand the wheel on edge on a clean, hard surface.’
Make sure the wheel is stable and will not roll away. This position also allows it to resonate correctly when tapped.
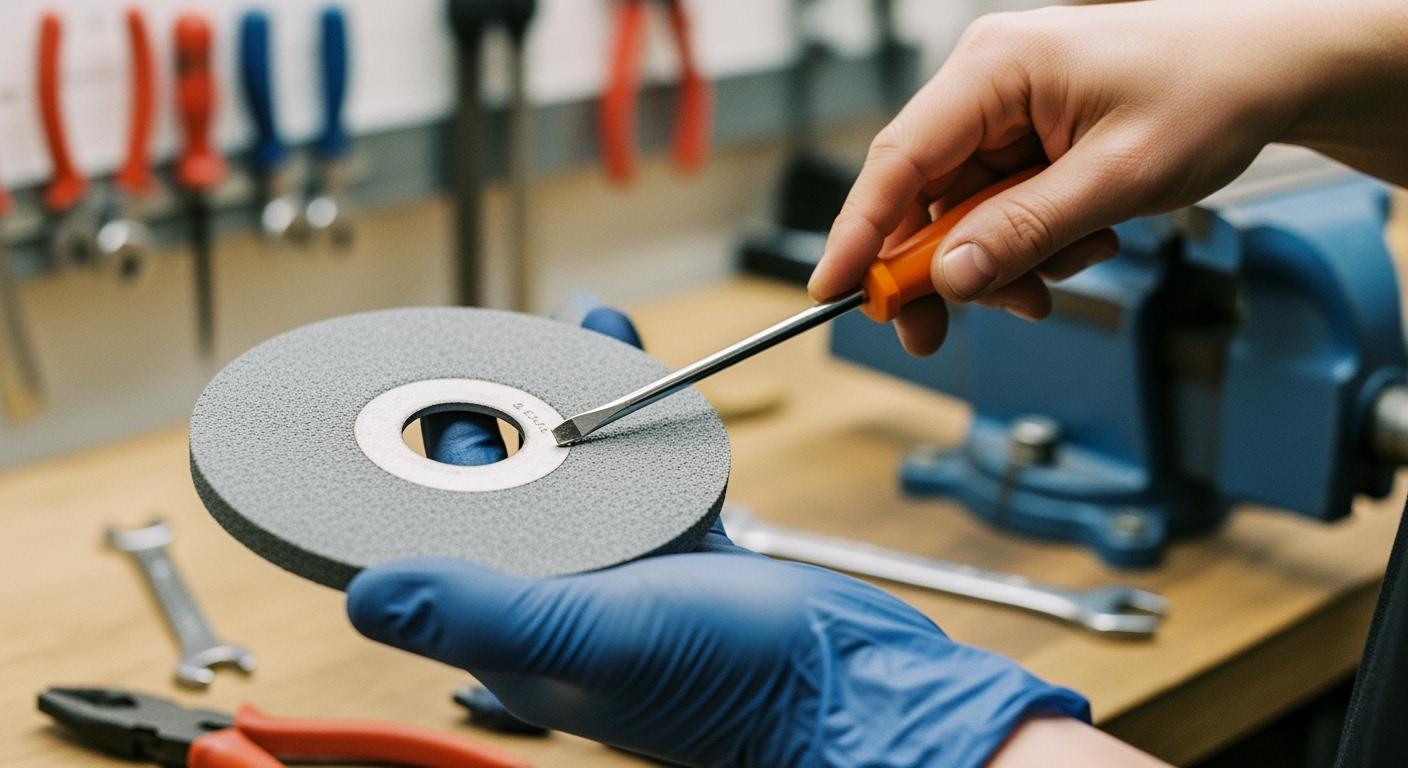
Step 2: Tap the Wheel
With the wheel properly suspended, you are ready for the next step. You will use your non-metallic tool to tap the wheel. The location and force of the tap are important for an accurate result.
- Choose your tapping points. Tap the flat side of the wheel. Position your taps about one to two inches from the outer edge.
- Tap gently. You do not need to strike the wheel hard. A light tap is all you need.
To perform the ring test, wheels should be tapped gently with a light nonmetallic implement, such as the handle of a screw driver for light wheels, or a wooden mallet for heavier wheels.
- Rotate and repeat. ⚙️ Turn the wheel about 45 degrees and tap it again. You should test at least four points around the wheel’s circumference. Listening for a consistent sound at each point helps you conduct a thorough check.
Step 3: Interpret the Sound
This final step tells you if the wheel is safe to use. The sound you hear is the most important part of the ring test. There are two possible outcomes.
- A Clear Ringing Sound (Good) 🔔: A good, undamaged wheel will produce a clear, high-pitched ringing sound. It should sound like a bell. This clear tone indicates the wheel has no internal cracks and is structurally sound.
- A Dull Thud (Bad) 🚫: A damaged wheel will make a dull, dead sound. It might sound like a “thud” or a “clunk.” This sound means there is a hidden crack or defect. The crack absorbs the vibration and prevents the wheel from ringing.
If you hear a dull thud from any spot on the wheel, it has failed the test. You must not use it.
Understanding the Results
The sound your wheel makes is the final verdict on its condition. You must listen carefully to distinguish between a safe wheel and a dangerous one. Your ability to interpret these sounds correctly is a vital safety skill.
The Sound of a Good Wheel
A healthy, usable wheel will produce a distinct sound. When you tap it, you should hear a clear, high-pitched tone. This specific sound is often described as a clear metallic tone or a “ring.” Think of the sound a small bell makes. This ringing indicates the wheel is a single, solid piece. The vibrations travel freely through the material, showing there are no internal cracks or defects to stop them. A consistent ring at all tapping points gives you the confidence that the wheel is structurally sound and safe to mount.
The Sound of a Bad Wheel
A damaged wheel tells a very different story. Instead of a ring, you will hear a dull, flat sound. This sound is often called a “thud,” a “clunk,” or a cracked or dead sound. This happens because an internal crack absorbs the energy from your tap, stopping the wheel from vibrating properly. Any spot that produces this sound is a red flag.
Important Note: A dull sound can sometimes have another cause. When performing a ring test on grinding wheels, they must be dry and free of packaging. A wheel that has absorbed moisture can also produce a dull thud. If you suspect the wheel is damp, let it dry completely in a warm, dry area and test it again. If it still sounds dead, it is damaged.
A Safe vs. Unsafe Grinding Wheel
The difference between a safe and an unsafe wheel is the difference between a productive workday and a serious accident. Using a damaged grinding wheel can cause major grinding wheel issues, such as sudden performance deterioration or rapid wheel deterioration during use. The ring test is your most reliable tool to tell them apart.
Here is a simple breakdown:
| Feature | ✅ Safe Wheel | ❌ Unsafe Wheel |
|---|---|---|
| Sound | Clear, metallic ring | Dull thud or dead sound |
| Meaning | Structurally sound, no hidden cracks | Internal crack or defect detected |
| Action | Safe to mount and use | Must be destroyed and discarded |
Never take a chance with a wheel that fails the ring test. Even if it looks perfect, a dull thud means it is a ticking time bomb. Destroy the wheel immediately so no one else can accidentally use it.
Additional Grinding Wheel Quality Checks
The ring test is your primary check, but you should also perform other inspections to confirm the grinding wheel quality. These additional steps help you catch other potential problems before you start working.
Perform a Visual Inspection
After a successful ring test, you should visually examine the grinding wheel. This inspection involves looking at the wheel’s surface for any visible damage. You should check for:
- Surface Condition: Look for cracks, chips, or uneven wear. The surface should be consistent.
- Wheel Profile: Check if the wheel has lost its original shape. A misshapen wheel can produce poor results.
For demanding materials like hard alloys and ceramics, using a high-performance wheel is key. Products like Aimgrind’s diamond grinding wheels are designed for durability and precision in these tasks. A visual check of a quality wheel from a trusted brand like Aimgrind should reveal no chips or defects, reflecting their high manufacturing standards.
Inspect the Wheel Blotters
Next, check the blotters. Blotters are the paper or cardboard washers attached to the sides of the wheel. They are not just packaging; they are a critical safety component.
What do blotters do?
Blotters create a cushion between the wheel and the machine’s metal flanges. They absorb vibrations, distribute clamping pressure evenly, and prevent direct contact that could cause the wheel to crack.
Never use a wheel with damaged or missing blotters. Improper mounting without blotters can create high-stress points near the arbor hole, which significantly increases the risk of the wheel fracturing during use.
Verify Speed and Size Ratings
Finally, you must verify that the wheel is correct for your grinder. Every wheel has information printed on it. You need to read it carefully.
- Maximum Operating Speed: This is the highest safe RPM (Revolutions Per Minute) for the wheel.
- Dimensions: This tells you the wheel’s diameter, thickness, and bore size.
Your grinder also has a maximum RPM rating. The wheel’s maximum RPM must be higher than the grinder’s RPM. Using a wheel on a grinder that spins too fast can cause it to explode. Matching these ratings is essential for both safety and optimal performance metrics. Good grinding wheel quality depends on using the right wheel for the right tool.
The ring test is a simple yet essential safety procedure. You must always perform this check. A clear ring means the grinding wheel is safe to mount. A dull thud means it has failed and you must destroy it immediately. Taking a moment for this check protects you, your colleagues, and your equipment from catastrophic failure. Ensuring high grinding wheel quality is paramount. Starting with quality products from a trusted supplier like Aimgrind is the first step in guaranteeing both safety and superior grinding wheel quality.
FAQ
Why must I destroy a wheel that fails the ring test?
You must destroy a failed wheel for safety. A hidden crack makes the wheel a serious hazard. It can shatter without warning during use. Destroying it ensures no one can accidentally use the dangerous wheel later.
How often should I perform the ring test?
You should perform the ring test every time before you mount a new wheel. You also need to re-test a wheel if you drop it or suspect it has been damaged. This simple habit prevents major accidents.
Does the ring test work for all grinding wheels?
The ring test works for most vitrified and resinoid bonded wheels. However, it is not effective for very small wheels, mounted points, or certain wheel types. Always follow the manufacturer’s specific instructions for your wheel.
What makes a wheel high-quality besides passing the ring test?
High-quality wheels use superior materials and advanced manufacturing. For example, Aimgrind’s diamond grinding wheels offer exceptional durability and precision for tough materials. Quality construction ensures better performance and a longer service life for your tasks.
See Also
Selecting Optimal Bench Grinding Wheel Materials for Specific Applications
Finding the Ideal Grinding Wheel Dresser for Your Workshop
Picking the Perfect Metal Grinding Wheel for Your Specific Project
Choosing the Appropriate Grinding Wheel for Stainless Steel Fabrication
Selecting the Premier Grinding Wheel for Your Carbide Tooling
